Network & Nodes Setup - EVM blockchain network deployment
Complete guide to deploying EVM blockchain networks on SettleMint. Learn how to add Ethereum, Polygon, and Arbitrum networks with validator nodes for enterprise dApps. Includes gas optimization, multi-chain deployment, and fault tolerance strategies.
Quick Network Setup: Deploy your first blockchain network in under 5 minutes. Choose from Ethereum mainnet/testnets, Polygon, Arbitrum, or private Hyperledger Besu networks. Perfect for enterprise dApps requiring gas optimization and multi-chain deployment.
Common Question: "Which blockchain network should I choose for my enterprise dApp? How do I optimize for gas costs and transaction speed?"
Answer:
- Public networks (Ethereum, Polygon, Arbitrum) = Lower setup cost, proven security, existing liquidity
- Private networks (Hyperledger Besu/Quorum) = Full control, zero gas fees, enterprise compliance
- Hybrid approach = Develop on private, deploy to public for maximum flexibility
Who needs blockchain network setup for EVM development?
Enterprise Teams
• **Supply chain** - Asset tracking and provenance • **Finance** - Payment rails and tokenization • **Identity** - Credential verification systems • **Real estate** - Property tokenization platforms
Development Teams
• **dApp builders** - Frontend-to-blockchain integration • **Protocol teams** - Custom consensus mechanisms • **DeFi projects** - AMMs, lending, derivatives • **NFT platforms** - Marketplaces and gaming
Prerequisites
Before setting up a blockchain network, you need an application created in your workspace. Applications provide organizational context for all blockchain resources including networks, nodes, and development tools.
Required First Step: Create an application before adding networks. Follow our create application guide if you haven't done this yet.
How do I choose the right blockchain network for my use case?
Best for: DeFi, NFTs, public dApps
Ethereum Mainnet/Testnets
- Gas cost: High ($5-50+ per transaction)
- Speed: 15 transactions/second
- Best for: High-value transactions, established DeFi
Polygon PoS
- Gas cost: Low ($0.01-0.10 per transaction)
- Speed: 65+ transactions/second
- Best for: Gaming, NFTs, micro-payments
Arbitrum One
- Gas cost: Medium ($0.50-2.00 per transaction)
- Speed: 40+ transactions/second
- Best for: DeFi with Ethereum compatibility
Best for: Enterprise, compliance, testing
Hyperledger Besu
- Gas cost: Zero (configurable)
- Speed: 1000+ transactions/second
- Best for: Supply chain, enterprise consortiums
GoQuorum
- Gas cost: Zero (configurable)
- Speed: 500+ transactions/second
- Best for: Financial services, private contracts
| Network | TPS | Gas Cost | Finality | Use Case |
|---|---|---|---|---|
| Ethereum | 15 | High | 12-15 min | DeFi, governance |
| Polygon | 65+ | Low | 2-3 sec | Gaming, NFTs |
| Arbitrum | 40+ | Medium | 1-2 min | DeFi scaling |
| Besu Private | 1000+ | Zero | Instant | Enterprise |
For the complete list of supported networks, see supported networks.

You can perform the same action via the SettleMint SDK CLI as well -
First ensure you're authenticated:
settlemint loginCreate a blockchain network:
settlemint platform create blockchain-network besu <network-name> \
  --node-name <node-name>

# Get information about the command and all available options
settlemint platform create blockchain-network besu --help
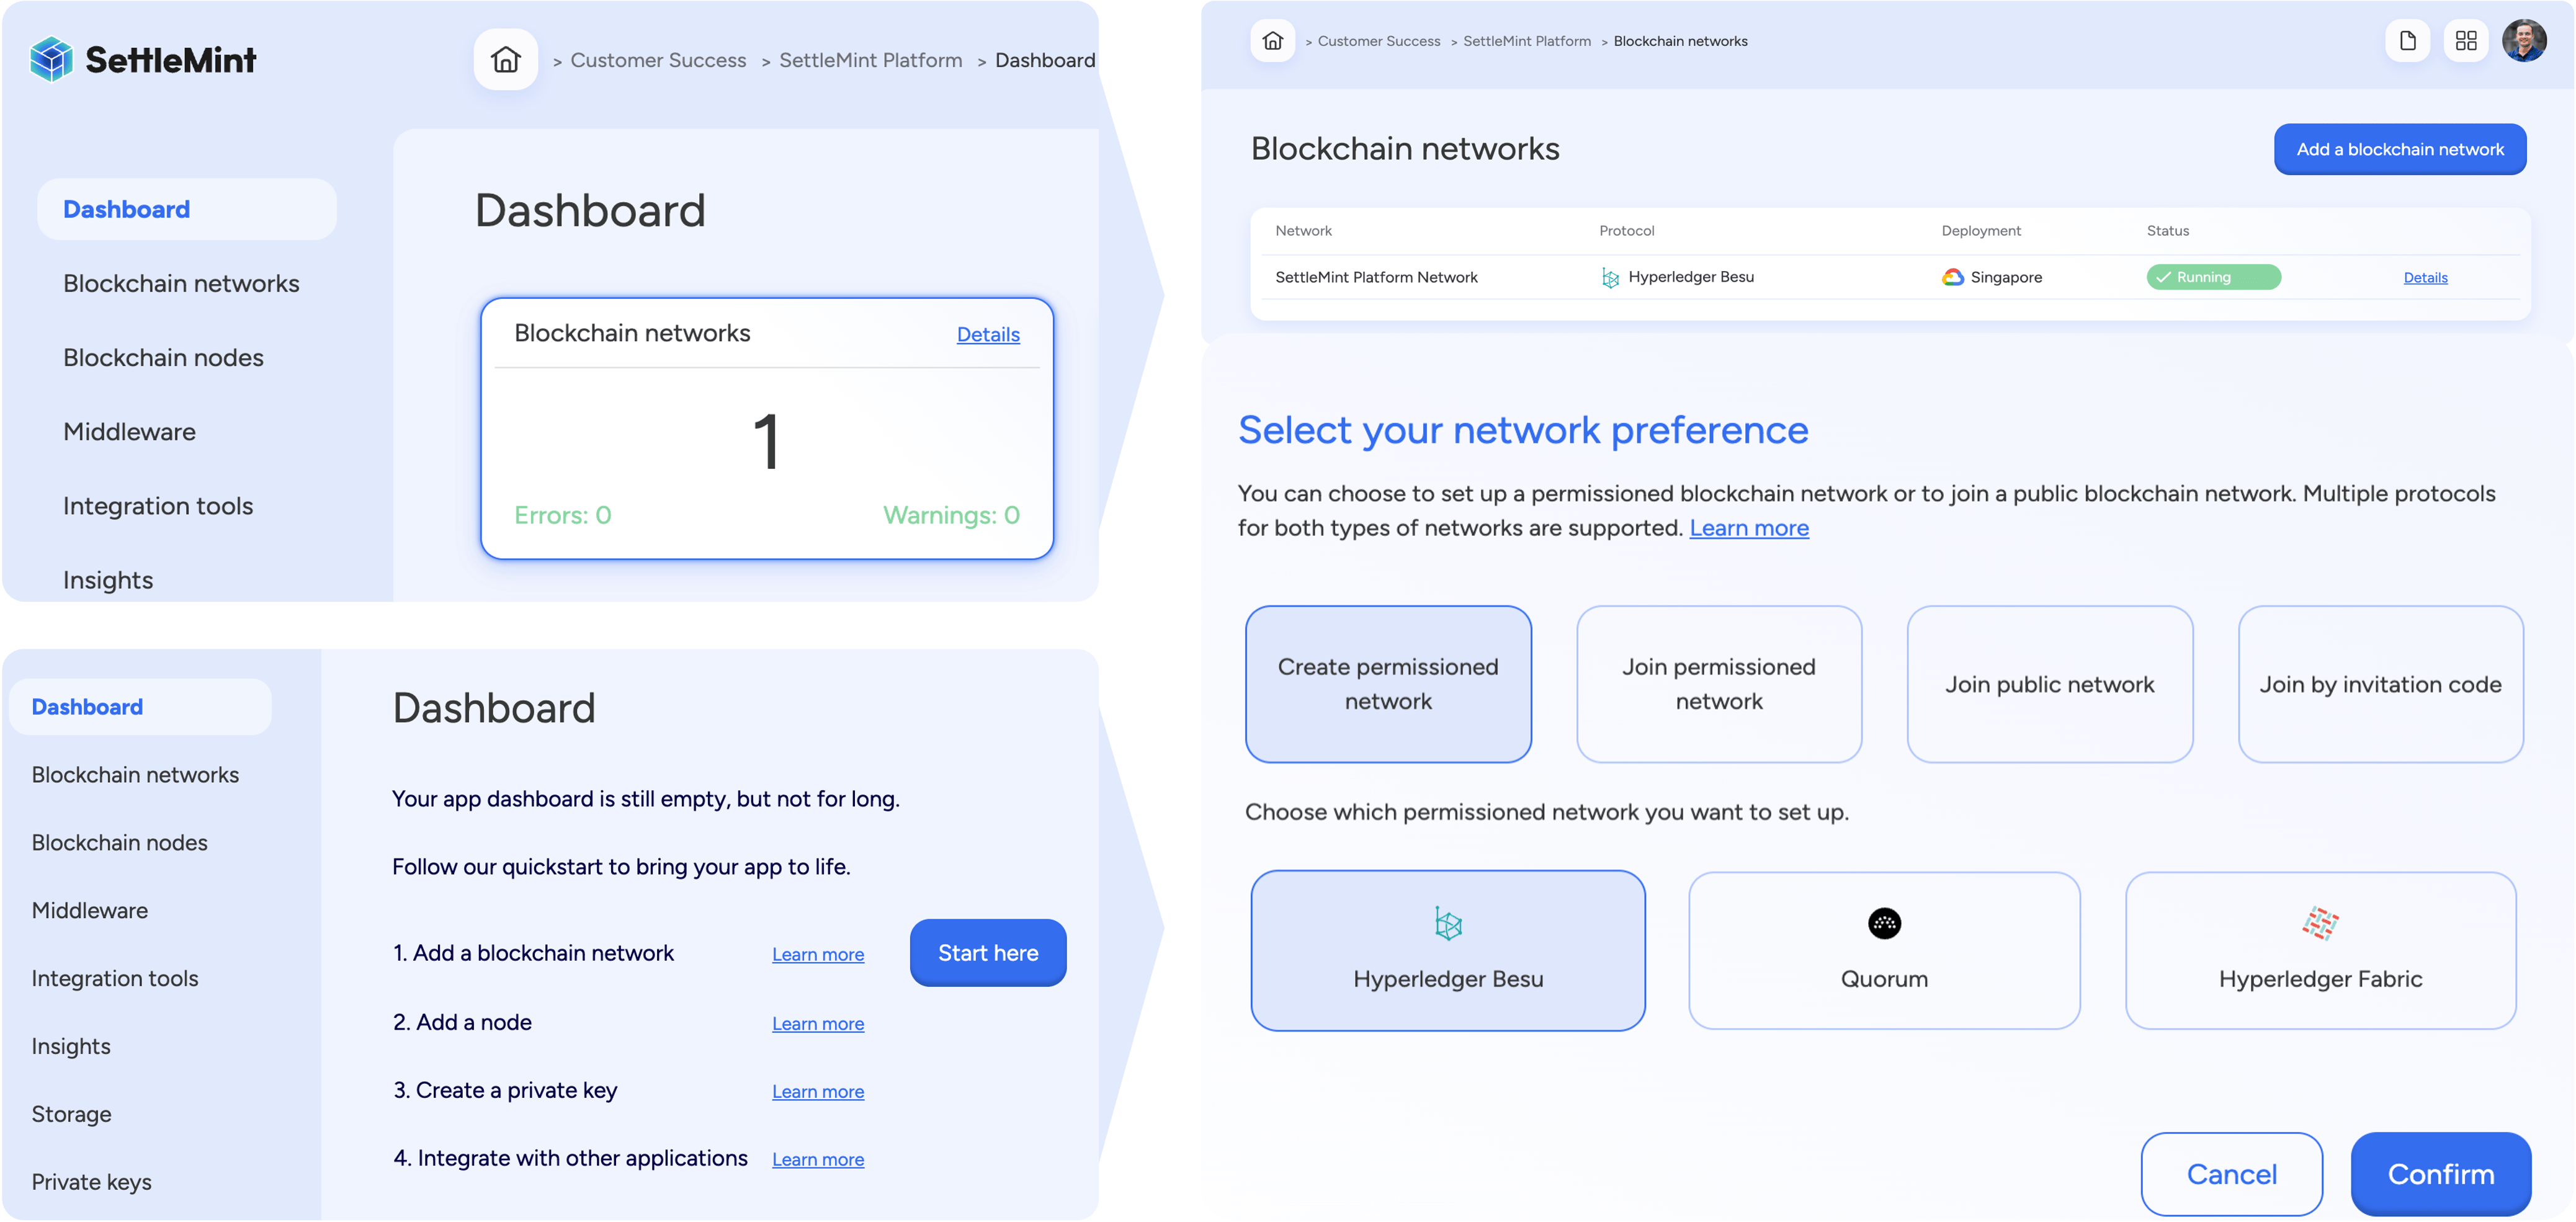
Navigate to application
Go to the application containing your network.
Add network
Click Add blockchain network to open a form.
Configure network
- Select the protocol of your choice and click Continue.
- Choose a network name and a node name.
- Configure your deployment settings and network parameters.
- Click Confirm to add the network.
import { createSettleMintClient } from '@settlemint/sdk-js';

const client = createSettleMintClient({
  accessToken: 'your_access_token',
  instance: 'https://console.settlemint.com'
});

// Create network
const createNetwork = async () => {
  const result = await client.blockchainNetwork.create({
    applicationUniqueName: "your-app",
    name: "my-network",
    nodeName: "validator-1",
    consensusAlgorithm: "BESU_QBFT",
    provider: "GKE", // GKE, EKS, AKS
    region: "EUROPE"
  });
  console.log('Network created:', result);
};

// List networks
const listNetworks = async () => {
  const networks = await client.blockchainNetwork.list("your-app");
  console.log('Networks:', networks);
};

// Get network details
const getNetwork = async () => {
  const network = await client.blockchainNetwork.read("network-unique-name");
  console.log('Network details:', network);
};

// Restart network
const restartNetwork = async () => {
  await client.blockchainNetwork.restart("network-unique-name");
};
Get your access token from the Platform UI under User Settings → API Tokens.
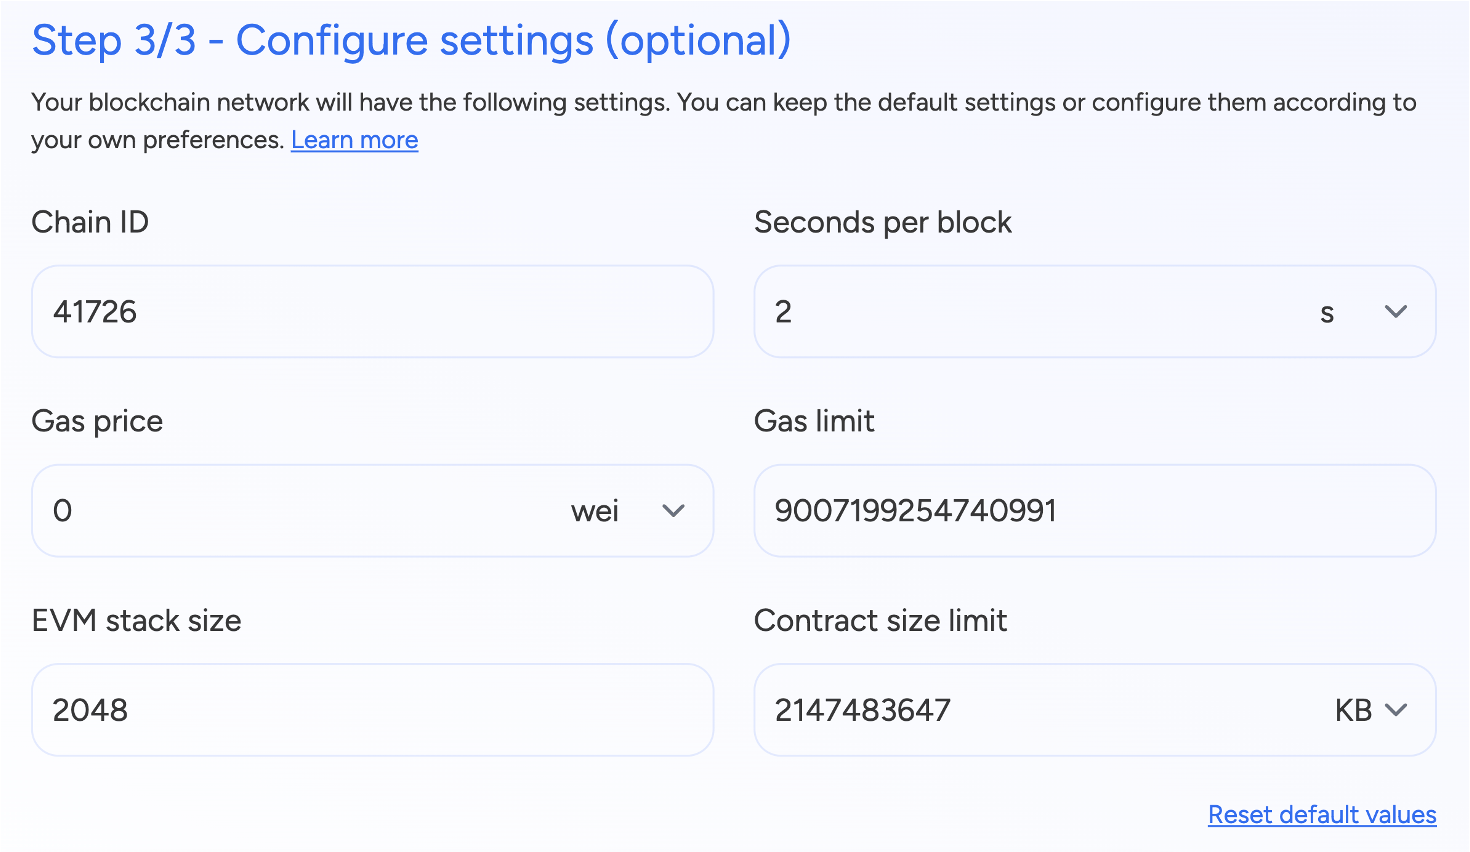
While deploying a network, you can tune various parameters to optimize performance and execution. The Chain ID serves as a unique identifier for your blockchain network, ensuring proper differentiation from others. The Seconds per block setting controls the block time interval, impacting transaction finality speed. Gas price defines the transaction cost per unit of gas, influencing network fees, while the Gas limit determines the maximum gas allowed per block, affecting computational capacity.
 The EVM stack size configures the stack depth for smart contract execution, and the Contract size limit sets the maximum contract code size to manage deployment constraints. Adjusting these settings allows for greater scalability, efficiency, and cost control based on your specific use case.
For EVM Chains, SettleMint allows you to set key genesis file paramters for a custom network configuration.
How do I optimize my blockchain network for gas efficiency?
How do I manage my blockchain network after deployment?
Network management can be done via SettleMint SDK CLI using these commands:
# List networks
settlemint platform list blockchain-networks --application <app-name>

# Get network details
settlemint platform read blockchain-network <network-name>

# Restart network
settlemint platform restart blockchain-network <network-name>
Navigate to your network and click Manage network to see available actions:
- View network details and status
- Monitor network health
- Restart network operations
// List networks
await client.blockchainNetwork.list("your-app");

// Get network details
await client.blockchainNetwork.read("network-unique-name");

// Restart network
await client.blockchainNetwork.restart("network-unique-name");
When we deploy a network, first node is automatically deployed with it and is a validator node. Once you have deployed a permissioned network or joined a public network, you can add more nodes to it.
How many blockchain nodes do I need for fault tolerance?
Common Question: "My blockchain network is running on a single node. How do I ensure it stays online and secure for production use?"
Answer: Single nodes create single points of failure. For production systems, you need multiple nodes to ensure Byzantine Fault Tolerance (BFT) and high availability.
Navigate to node management
Click the Blockchain Nodes tile on your dashboard or use the Blockchain Nodes link in the left menu.

Understand node requirements
We recommend the following node configurations for enterprise-grade reliability:
| Network | Validator Nodes | Non-Validator Nodes | Why? |
|---|---|---|---|
| Hyperledger Besu | 4 minimum | 2 minimum | BFT consensus requires 3f+1 nodes to tolerate f failures |
| GoQuorum | 4 minimum | 2 minimum | Istanbul BFT provides immediate finality with 4+ validators |
| Public Networks | N/A (external) | 2-3 archive nodes | Multiple nodes prevent single point of failure |
Byzantine Fault Tolerance: With 4 validator nodes, your network can continue operating even if 1 node fails or becomes malicious.
| Environment | Nodes Needed | Cost Optimization |
|---|---|---|
| Local Testing | 1 validator | Use Hardhat network for fastest iteration |
| Integration Testing | 2 validators | Minimal setup for CI/CD pipelines |
| Staging | 3 validators | Close to production for final testing |
Development Tip: Start with 1 node for rapid development, then scale to 4+ nodes before production deployment.
Enterprise High Availability Setup:
- Geographic Distribution: Deploy nodes across multiple regions
- Load Balancing: Distribute RPC calls across multiple non-validator nodes
- Monitoring: Set up alerts for node health and synchronization
- Backup Strategy: Regular snapshots and disaster recovery procedures
Recommended Architecture:
Region A: 2 Validators + 1 Non-Validator + Load Balancer
Region B: 2 Validators + 1 Non-Validator + Load Balancer
Nodes can also be added using SettleMint SDK CLI using the following commands-
Navigate to application
Go to the application containing your network.
Access nodes
Click Blockchain nodes in the left navigation.
Configure node
- Click Add a blockchain node.
- Select the blockchain network to add this node to.
- Choose a node name and node type (Validator/Non-Validator).
- Configure deployment settings.
- Click Confirm.
First ensure you're authenticated:
settlemint loginCreate a blockchain node:
settlemint platform create blockchain-node besu <node-name> \
  --blockchain-network <network-name> \
  --node-type <VALIDATOR|NON_VALIDATOR> \
  --provider <provider> \
  --region <region>

# Get help
settlemint platform create blockchain-node --help
import { createSettleMintClient } from '@settlemint/sdk-js';
const client = createSettleMintClient({
accessToken: 'your_access_token',
instance: 'https://console.settlemint.com'
});
const createNode = async () => {
const result = await client.blockchainNode.create({
applicationUniqueName: "your-application",
blockchainNetworkUniqueName: "your-network",
name: "my-node",
nodeType: "VALIDATOR",
provider: "provider",
region: "region"
});
console.log('Node created:', result);
};Get your access token from the Platform UI in left menu bar > Access Tokens.
Manage node
You can view node details and status, can monitor node health, pause and restart, or upgrade the node via the SDK CLI or the Platform UI.
Navigate to your node and click Manage node to see available actions:
- View node details and status
- Monitor node health
- Restart node operations
# List nodes
settlemint platform list services --application <application-name>

# Restart node
settlemint platform restart blockchain-node <node-name>
// List nodes
await client.blockchainNode.list("your-application");
// Get node details
await client.blockchainNode.read("node-unique-name");
// Restart node
await client.blockchainNode.restart("node-unique-name");All operations require appropriate permissions in your workspace.
How do I scale my blockchain network for high transaction throughput?
Common Question: "My dApp is getting 1000s of requests per minute. How do I prevent my blockchain nodes from becoming overwhelmed?"
Answer: Load balancers distribute incoming RPC requests across multiple nodes, preventing any single node from becoming a bottleneck.
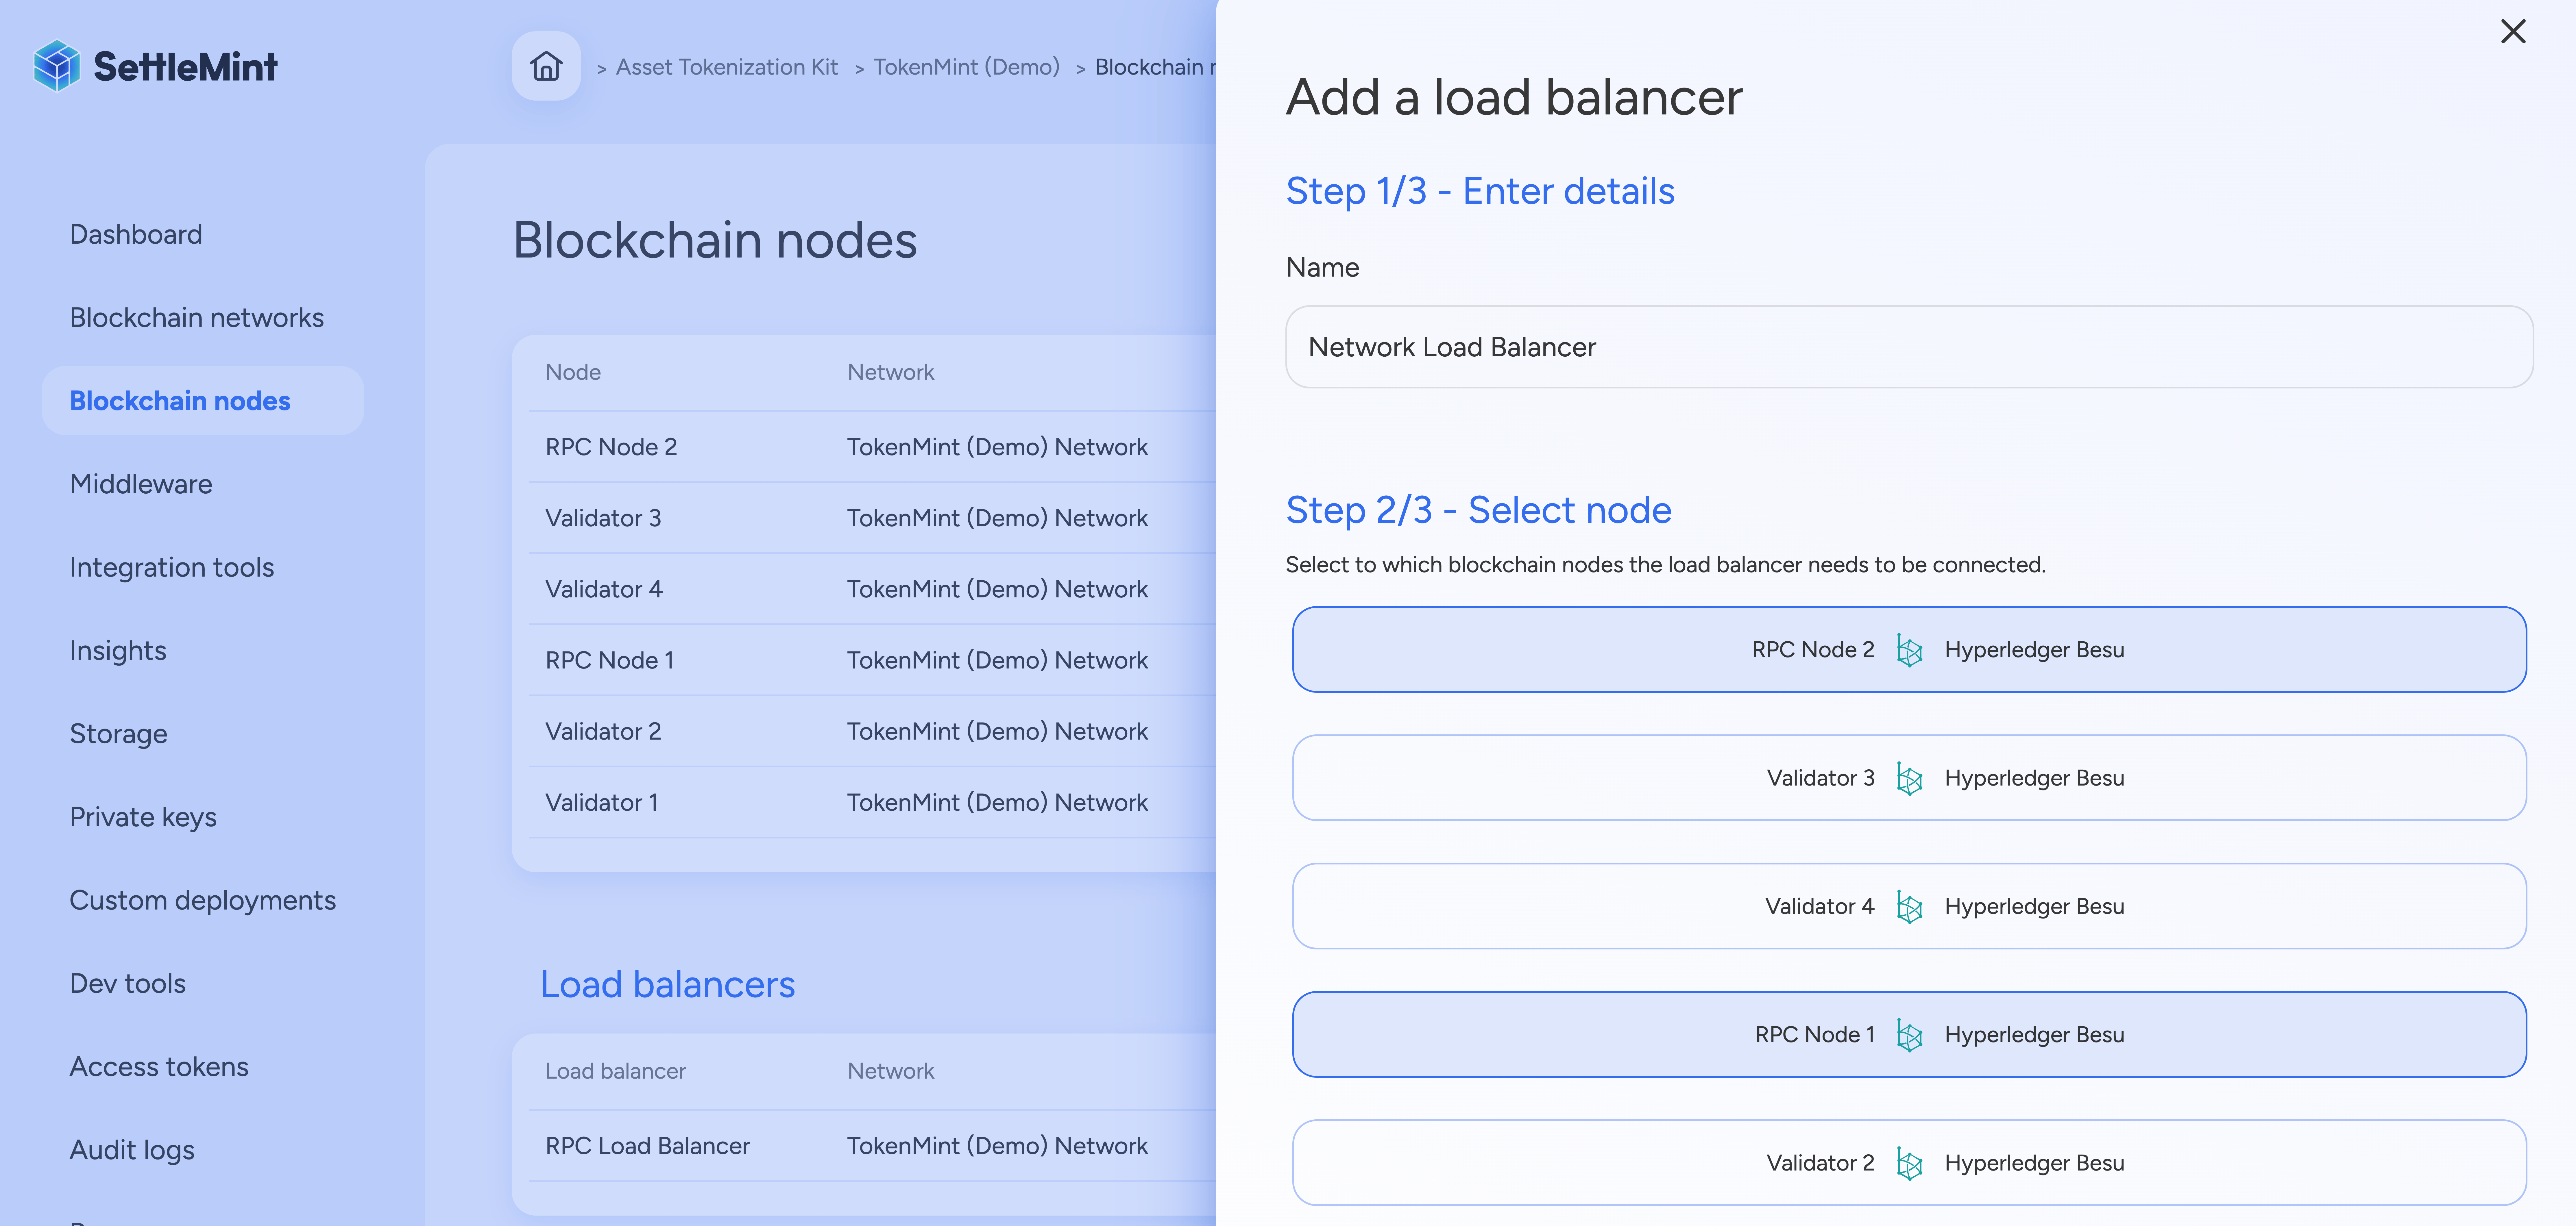
Add load balancer
Navigate to Blockchain nodes → Select your network → Click "Add load balancer"
Configure distribution
Choose region, provider, and resource configuration based on your traffic patterns
Connect nodes
Include at least 2 non-validator nodes for optimal redundancy and performance
Load Balancer Benefits
- • Traffic Distribution: Prevents node overload during high usage
- • Automatic Failover: Routes around unhealthy nodes
- • Geographic Routing: Connects users to nearest node for lower latency
- • Rate Limiting: Protects against DDoS attacks and spam


How do I monitor transactions and debug smart contract interactions?
Common Question: "How can I see what's happening on my blockchain? I need to debug failed transactions and monitor contract interactions."
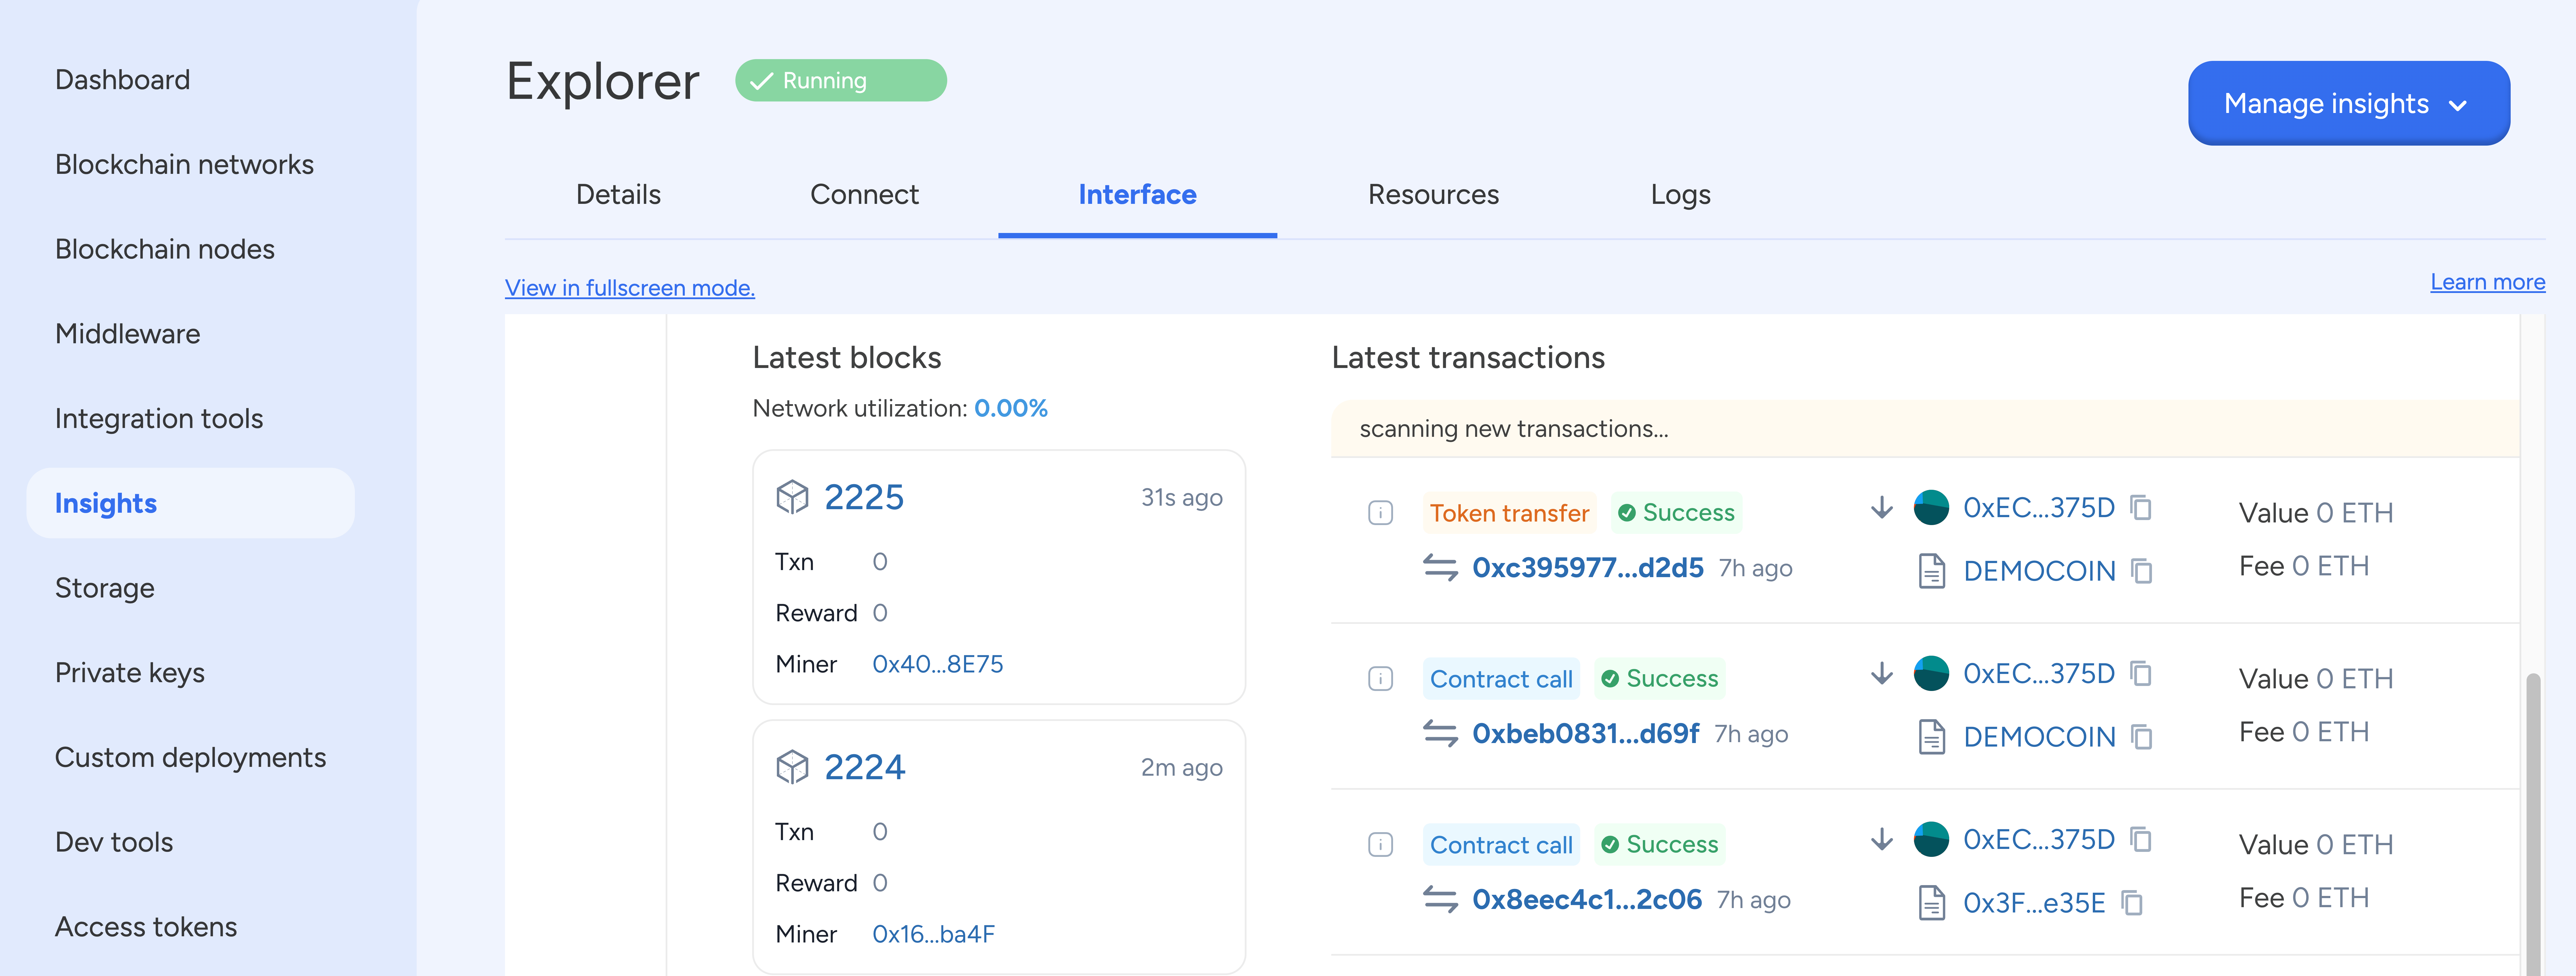
Answer: Blockchain explorers provide transaction monitoring, contract verification, and debugging capabilities essential for dApp development.
For Hyperledger Besu/Quorum Networks:
Add Blockscout explorer
Navigate to Insights → Click "Add blockchain explorer"
Configure explorer
Choose deployment region and resource pack based on expected usage
Access monitoring
Use the explorer to view transactions, verify contracts, and debug issues


Blockscout Features:
- Real-time transaction monitoring
- Smart contract verification and interaction
- Address balance tracking
- Network statistics and health metrics
Use these established blockchain explorers:


Public Network Blockchain Explorers
Layer 1 Networks
**Ethereum** - Mainnet: [Etherscan](https://etherscan.io/), Testnets: [Sepolia](https://sepolia.etherscan.io/) / [Holesky](https://holesky.etherscan.io/) **Avalanche** - Mainnet: [SnowTrace](https://snowtrace.io/), Testnet: [Fuji](https://testnet.snowtrace.io/) **Hedera Hashgraph** - Mainnet: [HashScan](https://hashscan.io/mainnet), Testnet: [HashScan Testnet](https://hashscan.io/testnet)
Layer 2 Networks
**Polygon PoS** - Mainnet: [PolygonScan](https://polygonscan.com/), Testnet: [Amoy](https://amoy.polygonscan.com/) **Polygon zkEVM** - Mainnet: [zkEVM Explorer](https://zkevm.polygonscan.com/), Testnet: [zkEVM Testnet](https://testnet-zkevm.polygonscan.com/) **Arbitrum** - Mainnet: [Arbiscan](https://arbiscan.io/), Testnet: [Arbitrum Goerli](https://goerli.arbiscan.io/) **Optimism** - Mainnet: [Optimistic Etherscan](https://optimistic.etherscan.io/), Testnet: [Optimism Goerli](https://goerli-optimism.etherscan.io/)
What's the typical timeline for blockchain network deployment?
Network Creation (2-5 minutes)
Basic network deployment with first validator node
Node Addition (5-10 minutes per node)
Adding additional validator and non-validator nodes for fault tolerance
Load Balancer Setup (3-5 minutes)
Configuring traffic distribution across nodes
Explorer Integration (5-10 minutes)
Setting up transaction monitoring and debugging tools
🎉 Congratulations!
You have successfully built the blockchain infrastructure layer for your application. Your network is now ready for:
- Smart contract deployment
- dApp integration
- Enterprise-grade transaction processing
Next Step: Set up private keys and wallets for transaction signing and user management.
Create Application
Step-by-step guide to creating blockchain applications and organizations on SettleMint. Set up team collaboration, manage billing, and deploy your first blockchain project. Includes UI, CLI, and SDK examples for developers.
Private Keys & HD Wallets
Complete guide to EVM private key management on SettleMint. Learn ECDSA vs HD wallets, transaction signing, user wallet generation, and enterprise security patterns for Ethereum, Polygon, and Arbitrum networks.