BEP-721 token
The BEP-721 token standard is the native token standard of Binance Smart Chain, and is an extension of the ERC-721 token standard. The BEP-721 and the ERC-721 are identical in function and features.
ERC-721 tokens are blockchain-based assets, issued on all EVM compatible blockchain networks like Binance Smart Chain, that have value and can be sent and received. Contrary to the ERC-20 tokens, these ERC-721 tokens are non- fungible, meaning that two tokens from the same smart contract are not equivalent.
Non-fungible tokens, or NFTs, are digitally unique, no two NFTs are the same. For example, if Alice and Bob exchange their NFTs, one of them might feel unlucky as their new token is worth less than their previous ones. NFTs give the ability to assign or claim ownership of any unique piece of digital data, trackable on the blockchain. It can be created from digital objects, as a representation of digital or non-digital assets.
Examples of what an NFT can represent are real estate properties, collectibles, event tickets, music videos, and artwork.
The SettleMint platform comes with three ERC-721 contract sets.
- The first one, simply called ERC-721 Token, has all the functionalities to create the token, but it has no specific asset attached to it. It is up to you to create one. The optimised ERC-721a Token provides significant gas savings for minting multiple NFTs in a single transaction.
- The second set, called ERC-721 trading cards, show you how you can create trading cards with different scarcities.
- Finally, the third set, called ERC-721 Generative Art, demonstrates how you can automatically create images by combining several layers of assets. This is the process that was used to create famous NFT collections such as the Bored Ape Yacht Club or the Cryptopunks.
The trading cards and the generative art sets are extensions of the ERC-721 Token set. The specific features related to these two sets are presented in their respective sections.
ERC-721 smart contract features
An ERC-721 smart contract is used to create non-fungible tokens and bring them to the blockchain.
The process of creating an ERC-721 has a few distinct phases. The smart contract sets define one such a process which is what we describe below. This is by no means the only way to run your ERC-721 project, if you plan not to follow the playbook below, you can use it to setup your own flow easily.
Phase 0: Image generation
Generative Art
The image generation code for the generative art set is based on the Hashlips Art Engine, please check out the
README file in the art_engine folder on the usage instructions.
In short, replace the images in the art_engine/layers folder, change the settings in the art_engine/src/config.js file, and run yarn artengine:build to generate your images. Rinse and repeat until you are happy with the result. Note that the generated images are randomized
to prevent streaks of similar images, this can be configured in the art_engine/src/config.js file.
If you want to use the engine to generate a preview image run yarn artengine:preview for a static image and yarn artengine:preview_gif for a gif.
Using yarn artengine:rarity you can check the rarity of each generated image.
If you want to pixelate your images, use yarn artengine:pixelate, the settings are again in the art_engine/src/config.js file.
Not that the generated metadata does not have a real base uri set, after we have uploaded everything to IPFS, we can set it in the art_engine/src/config.js file and update all the metadata using yarn artengine:update_info.
The end result looks like this:

{
  "name": "thumbzup #419",
  "image": "ipfs://bafybeihroeexeljv5yoyum2x4jz6riuqp6xwg6y7cg7jaumcdpyrjxg5zi",
  "attributes": [
    {
      "trait_type": "background",
      "value": "yellow"
    },
    {
      "trait_type": "body",
      "value": "thumb"
    },
    {
      "trait_type": "face",
      "value": "happy"
    },
    {
      "trait_type": "hair",
      "value": "long brown hair"
    },
    {
      "trait_type": "accessories",
      "value": "sunglasses"
    }
  ]
}
Trading Cards
The image generation code for Trading Cards is based on the a Hardhat task found in the tasks folder. This task is written especially for the
cards for this example project, but it should be fairly simple to adapt it to your needs.
In short, replace the images in the assets/layers folder, change the logic in the task/generate-assets.ts file. To generate the trading cards execute yarn artengine:build --common 10 --limited 5 --rare 2 --unique 1 --ipfsnode <key of your ipfsnode>. The ipfs node key can be found in .secrets/default.hardhat.config.ts.
The end result would look like this:
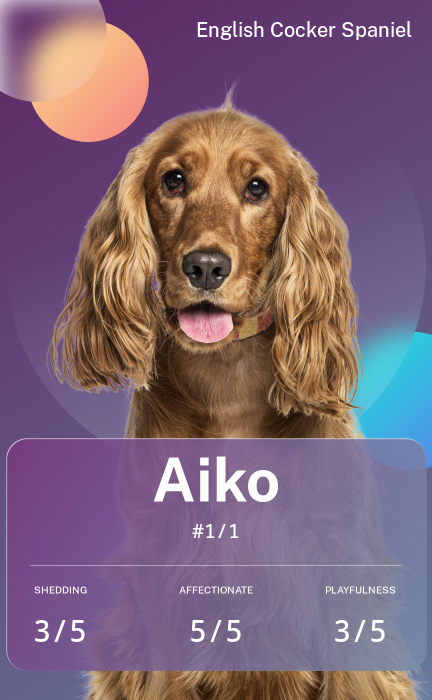
{
  "name": "Aiko (#1/1)",
  "description": "Aiko can express more with his tail in seconds than his owner can express with his tongue in hours.",
  "image": "ipfs://bafybeia5truvedhrtdfne3qmoh3tvsvpku6h4airpku6eqvcmrfoja7h4m",
  "attributes": [
    {
      "trait_type": "Serial Number",
      "value": 1,
      "max_value": 1,
      "display_type": "number"
    },
    {
      "trait_type": "Breed",
      "value": "English Cocker Spaniel"
    },
    {
      "trait_type": "Shedding",
      "value": 3,
      "max_value": 5,
      "display_type": "number"
    },
    {
      "trait_type": "Affectionate",
      "value": 5,
      "max_value": 5,
      "display_type": "number"
    },
    {
      "trait_type": "Playfulness",
      "value": 3,
      "max_value": 5,
      "display_type": "number"
    },
    {
      "trait_type": "Floof",
      "display_type": "boost_number",
      "value": 100
    },
    {
      "trait_type": "Birthday",
      "value": 1605465513,
      "display_type": "date"
    }
  ]
}
Phase 1: Initial Setup
The first step of the process is to deploy the ERC721 contract, and claim the reserve tokens.
Reserves are an initital amount of tokens that are created at the start of the sale. This is used typically to generate tokens for the team members and to mint tokens for later use (e.g. for marketing purposes).
During this setup phase, some of the important parameters of the sale and collection are set. In the
contract look for the Configuration section and tweak the parameters as needed.
  //////////////////////////////////////////////////////////////////
  // CONFIGURATION                                                //
  //////////////////////////////////////////////////////////////////

  uint256 public constant RESERVES = 5; // amount of tokens for the team, or to sell afterwards
  uint256 public constant PRICE_IN_WEI_WHITELIST = 0.0069 ether; // price per token in the whitelist sale
  uint256 public constant PRICE_IN_WEI_PUBLIC = 0.0420 ether; // price per token in the public sale
  uint256 public constant MAX_PER_TX = 6; // maximum amount of tokens one can mint in one transaction
  uint256 public constant MAX_SUPPLY = 100; // the total amount of tokens for this NFT
Furthermore, the collection will be launched without exposing any of the metadata or art, leaving the
reveal for after the public sale. In the assets/placeholder folder, modify the artwork and metadata
which will be exposed until the reveal.
Also make sure to go through the files in the deploy folder to change any of the values to match your project.
When you are happy with the setup, you can deploy the contract and claim the reserves by running.
yarn smartcontract:deploy:setup
Phase 2: Building the whitelist
To have a successful launch, you will engage in a lot of marketing efforts and community building. Typically before engaging in the actual sale, various marketing actions are taken to build a whitelist. This list is to allow people to buy in before the public sale. Allowing a person on the whitelist should be close to a concrete commitment to the sale.
Thw whitelist process is built to be very gas efficient using Merkle Trees. You start by filling the assets/whitelist.json file
with the addresses of the whitelisted participants and they amount they can buy in the pre-sale.
When you have enough commitments we will built the Merkle Tree, generate all the proofs and stire the Merkle Root in the contract.
yarn smartcontract:deploy:whitelist
This will export the proofs needed to include in your dAPP in the ./assets/generated/whitelist.json file. Your dAPP
will provide a page where the participants connects their wallet to. Using the address of the wallet, you can load the
proofs and allowances from this JSON file. The dAPP will then configure a form where the participant can choose,
with a maximum of their allowance, how many tokens they want to buy. Pressing the submit button will trigger a transaction
to the whitelistMint function with all the parameters filled in and the correct amount of ETH/MATIC/etc as a value.
The user signs this transaction in their wallet and the transaction is sent to the network.
To display the state of the sale, the items minted, the items left, use the GraphQL endpoint from the The Graph node you can launch in the SettleMint platform.
Phase 3: Opening up the pre-sale
As soon as you execute the following command, the pre-sale is live.
yarn smartcontract:deploy:presale
Phase 4: Opening up the public sale
As soon as you execute the following command, the pre-sale is terminated and the public sale is live.
yarn smartcontract:deploy:publicsale
Phase 5: The big reveal
At some point during the process, you will want to reveal the metadata. Some projects choose to reveal immediately, others choose to reveal after the whitelist sale, and others will wait until a point during the public sale or even after it has concluded.
Revealing the metadata is done by switching the baseURI to the final IPFS folder with setBaseURI. This can be followed up by running the following to freeze the metadata and prevent further changes.
yarn smartcontract:deploy:reveal
Integration with the Middleware
Working with complex or large data in your dApp can be a challenge. In the SettleMint platform we provide you with a middleware solution that allows you to index and query this data easily and efficiently.