Backend-as-a-service
Many dApps need more than just decentralised tools to build an end-to-end solution. Maybe you need to save KYC information, or store metadata related to NFT's or other smart contracts you do not want to put on IPFS. This is where the backend-as-a-service solution comes in, based on Hasura.
Add Hasura
Navigate to the application where you want to add Hasura. Click Integration tools in the left navigation, and then click Add an integration tool. This opens a form.
Follow these steps to add the Hasura:
- Select Hasura, and click Continue.
- Choose a name for your own backend-as-a-service. Choose one that will be easily recognizable in your dashboards.
- Choose a deployment plan. Select the type, cloud provider, region and resource pack. More about deployment plans.
- You see the resource cost for your backend-as-a-service displayed at the bottom of the form. Click Confirm to add it.
When Hasura is deployed, you can build and manage your database in the Interface tab.
Some basic features
- Under the data subtab you can create an arbitrary number of schema's. A schema is a collection of tables.
- In a schema you can create tables, choose which columns you want and define relations and indexes.
- You can add, edit and delete data in these columns as well. Learn more here
Any table you make is instantly visible in the API subtab. Note that by using the REST and Derive Action buttons you can convert queries into REST endpoints if that fits your application better. Using the Code Exporter button you can get the actual code snippets you can use in your application or the integration studio.
A bit more advanced are actions. Actions are custom queries or mutations that are resolved via HTTP handlers. Actions can be used to carry out complex data validations, data enrichment from external sources or execute just about any custom business logic. Actions can be kickstarted by using the Derive Action button in the API subtab. Learn more here.
If you need to execute tasks based on changes to your database you can leverage Events. An Event Trigger atomically captures events (insert, update, delete) on a specified table and then reliably calls a HTTP webhook to run some custom business logic. Learn more here.
Cron Triggers can be used to reliably trigger HTTP endpoints to run some custom business logic periodically based on a cron schedule.
One-off Scheduled Events are individual events that can be scheduled to reliably trigger a HTTP webhook to run some custom business logic at a particular timestamp.
Access to your database can be handled all the way to the row level by using the authentication and authorisation options available in Hasura. Learn more here.
This is of course on top of the API keys in the platform you can use to close of access to the entire API.
Backups
You should take a backup of the following components:
- Hasura Database
- Hasura Metadata
Steps for taking a backup of Hasura Database
- Install Hasura CLI (https://hasura.io/docs/latest/hasura-cli/install-hasura-cli/)
- Run hasura init command to initiate a new Hasura project in the working directory.
- Edit config.yaml file to configure remote Hasura instance. We need to generate an API Key in BPaaS and pass it with the endpoint.
config.yaml example:
version: 3

endpoint: <hasura-db-endpoint-here/API-key>
admin_secret: <admin-secret-here>

metadata_directory: metadata
actions:
 kind: synchronous
 handler_webhook_baseurl: http://localhost:3000
- Run hasura console command. (this command will sync everything to your local hasura instance.)
- Run this curl command to generate DB export:
Curl Format
curl -d '{"opts": [ "-O", "-x", "--schema=public", "--inserts"], "clean_output": true, "source": "default"}' -H "x-hasura-admin-secret: <SecretKey>" <Endpoint URL/APIKey>/v1alpha1/pg_dump > db.sql
Example Curl
curl -d '{"opts": [ "-O", "-x", "--schema=public", "--inserts"], "clean_output": true, "source": "default"}' -H "x-hasura-admin-secret:78b0e4618125322de0eb" https://fuchsiacapybara-7f70.gke-europe.settlemint.com/bpaas-1d79Acd6A2f112EA450F1C07a372a7D582E6121F/v1alpha1/pg_dump > db.sql
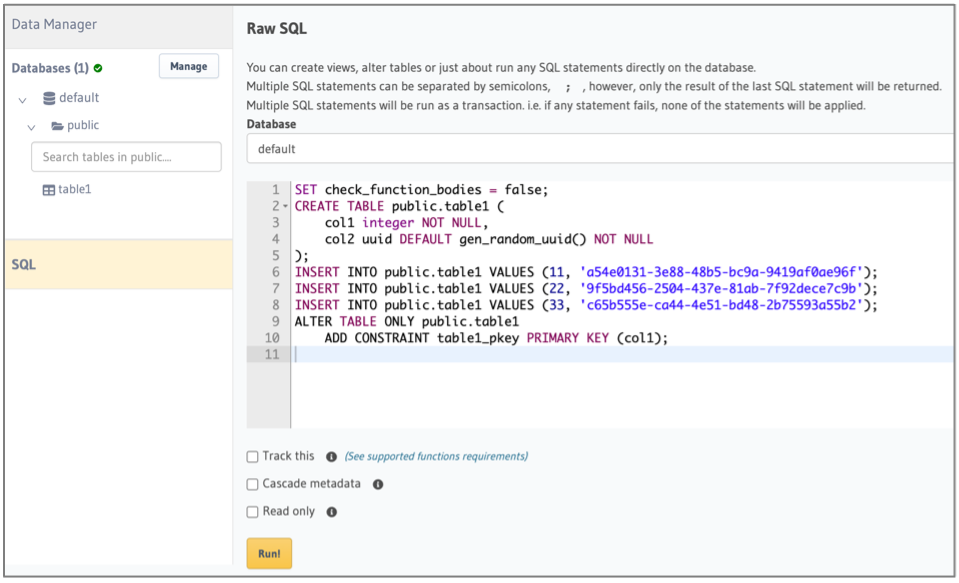
Importing data into a new instance
Please copy the content of the exported db.sql file, paste it and execute as a SQL statement.
More info on this and other commands can be found in the Hasura docs, please note to always add the x-auth-token header with an api key for your Hasura instance.
Steps for taking a backup of Hasura Metadata
Hasura Metadata Export is a collection of yaml files which captures all the Metadata required by the GraphQL Engine. This includes info about tables that are tracked, permission rules, relationships, and event triggers that are defined on those tables.
If you have already initialized your project via the Hasura CLI you should see the Metadata directory structure in your project directory.
To export your entire Metadata using the Hasura CLI execute the following command in your terminal:
#in hasura CLI
hasura metadata export
This will export the Metadata as YAML files in the /metadata directory
Steps for importing or applying Hasura Metadata
You can apply Metadata from one Hasura Server instance to another. You can also apply an older or modified version of an instance's Metadata onto itself to replace the existing Metadata. Applying or importing completely replaces the Metadata on that instance, i.e. you lose any Metadata that existed before applying.
#in hasura CLI
hasura metadata apply
Reload Hasura Metadata
In some cases, the Metadata can be out of sync with the database schema. For example, when a new column has been added to a table via an external tool.
#in hasura CLI
hasura metadata reload
For more on Hasura Metadata, refer: https://hasura.io/docs/latest/migrations-metadata-seeds/manage-metadata/ For more on Hasura Migrations, refer: https://hasura.io/docs/latest/migrations-metadata-seeds/manage-migrations/