Integration studio
The SettleMint Integration Studio is a low-code development environment which enables you to implement business logic for your application simply by dragging and dropping.
Under the hood, the Integration Studio is powered by a Node-RED instance dedicated to your application. It is a low-code programming platform built on Node.js and designed for event-driven application development. Learn more about Node-RED here.
Basic concepts
The business logic for your application can be represented as a sequence of actions. Such a sequence of actions is represented by a flow in the Integration Studio. To bring your application to life, you need to create flows. Nodes are the smallest building blocks of a flow.
Nodes The nodes are the smallest building blocks. They can have at most one input port, and multiple output ports. They are triggered by some event (eg. an http request). When triggered, they perform some user defined actions, and generate an output. This output can be passed to the input of another node, to trigger another action.
Flows A flow is represented as a tab within the editor workspace and is the main way to organize nodes. You can have more than one set of connected nodes in a flow tab.
The Integration Studio allows you to create flows in the fastest way possible. You can drag and drop nodes in workspace and easily connect them by clicking from the output port of one node to input port of another to create complex flows. This allows you to visualise the orchestration and interaction between your components (your nodes). Since you can clearly visualize the sequence of actions your application is going to perform, it is not only more interpretable but also much easier to debug in the future.
The use cases include interacting with other web services, applications, and even IoT devices - orchestrating them for any kind of purpose to bring your business solution to life.
Learn more about the basic concepts of Node-RED here
Adding the Integration Studio
Navigate to the application where you want to add the integration studio. Click Integration tools in the left navigation, and then click Add an integration tool. This opens a form.
Follow these steps to add the Integration Studio:
- Select Integration Studio and click Continue to proceed.
- Choose a name for your Integration Studio. Choose one that will be easily recognizable in your dashboards (eg. Crowdsale Flow)
- Choose a deployment plan. Select the type, cloud provider, region and resource pack. More about deployment plans
- You can see the resource cost for the Integration Studio displayed at the bottom of the form. Click Confirm to add the Integration Studio.
Using the Integration Studio
When the Integration Studio is deployed, click on it from the list, and go to the Interface tab to start building your flows. You can also view the interface in full screen mode.
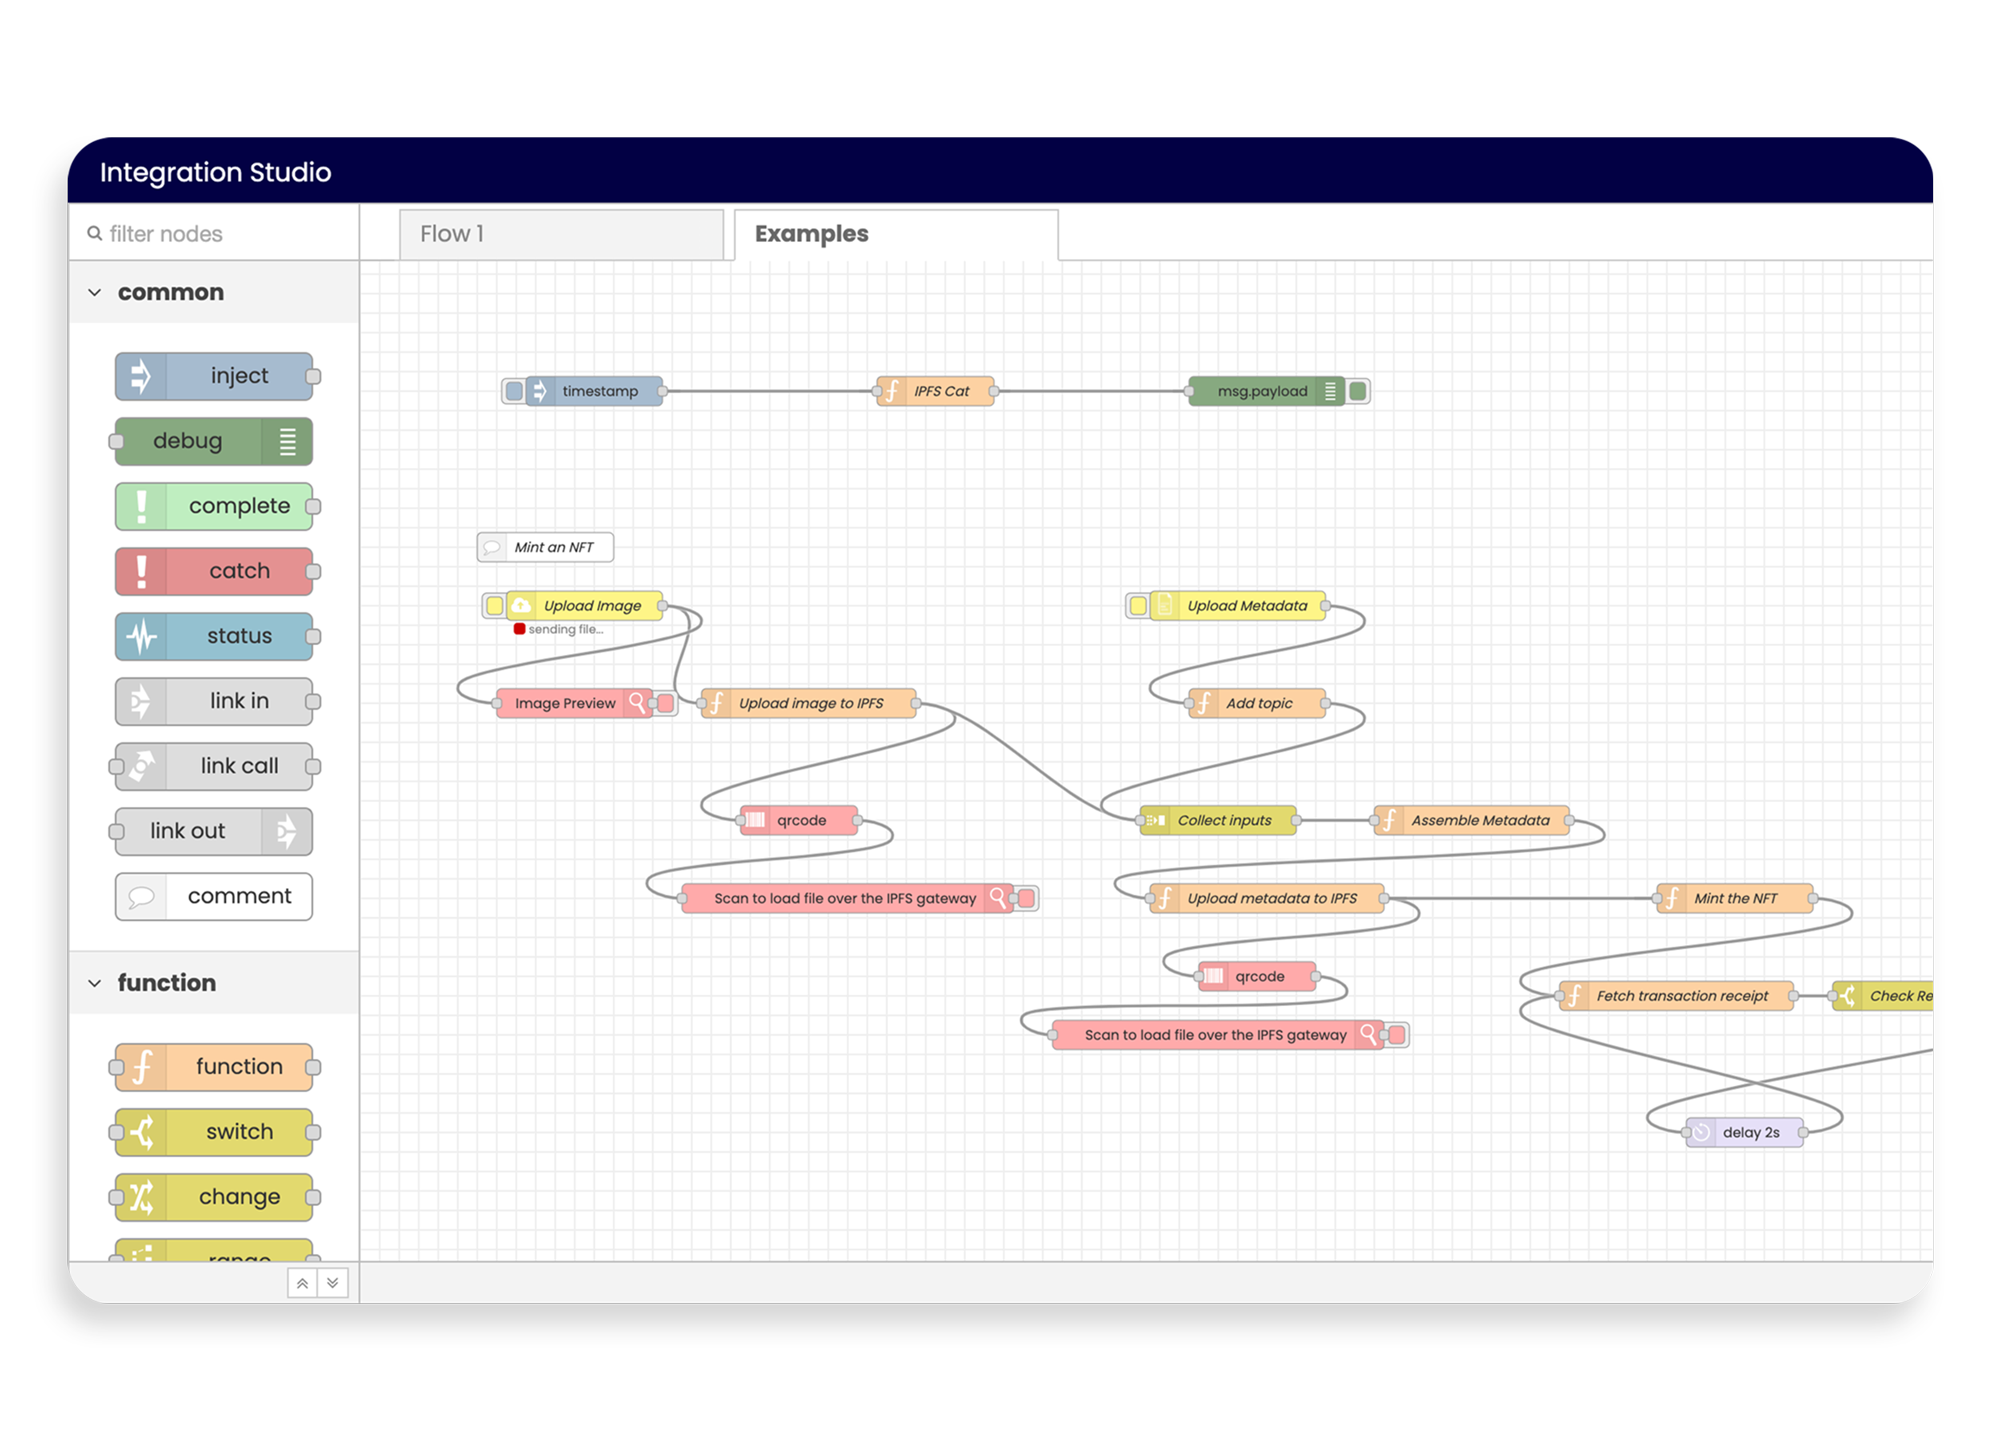
Once the Integration Studio interface is loaded, you will see 2 flow tabs: “Flow 1” and “Example”. Head over to the “Example” tab to see some full blown example flows to get you started.
Double-click any of the nodes to see the code they are running. This code is written in JavaScript, and it represents the actions the particular node performs.
Setting up a flow
Before we show you how to set up your own flow, we recommend reading this article by Node-RED on creating your first flow.
Now let's set up an example flow together and build an endpoint to get the latest block number of the Polygon Mumbai Testnet using the Integration Studio. If you do not have a Polygon Mumbai Node, you can easily deploy a node first.
Step 1
Drag and drop a Http In node to listen for requests. If you double-click the node, you will see you have a couple parameters to set:
METHOD - set it to GET. This is HTTP Method that your node is configured to listen to.
URL - set it to /getLatestBlock. This the endpoint that your node will listen to.
Step 2
Drag and drop a function node. This is the node that will query the blockchain for the block number. Double-click the node to configure it. You can use the snippet below to set it up.
rpcEndpoint is the RPC url of your Polygon Mumbai Node.
Under the Connect tab of your Polygon Mumbai node, you will find its RPC url.
apiKey - You will need an API key for your node. If you do not have one, you can easily create an API key first.
Enter the following snippet in the Message tab.
///////////////////////////////////////////////////////////
// Configuration                                         //
///////////////////////////////////////////////////////////

const rpcEndpoint = 'https://YOUR_NODE_RPC_ENDPOINT.settlemint.com';
const apiKey = 'bpaas-YOUR_NODE_API_KEY_HERE';

///////////////////////////////////////////////////////////
// Logic                                                 //
///////////////////////////////////////////////////////////

const ethers = global.get('ethers');
const provider = new ethers.providers.JsonRpcProvider(`${rpcEndpoint}/${apiKey}`);
msg.payload = await provider.getBlockNumber();

return msg;

///////////////////////////////////////////////////////////
// End                                                   //
///////////////////////////////////////////////////////////
Note:
ethers and some ipfs libraries are already available by default and can be used like this:
const ethers = global.get('ethers');
const provider = new ethers.providers.JsonRpcProvider(`${rpcEndpoint}/${apiKey}`);

const ipfsHttpClient = global.get('ipfsHttpClient');
const client = ipfsHttpClient.create(`${ipfsEndpoint}/${apiKey}/api/v0`);

const uint8arrays = global.get('uint8arrays');
const itAll = global.get('itAll');
const data = uint8arrays.toString(uint8arrays.concat(await itAll(client.cat(cid))));
if the library you need isn't available by default you will need to import it in the setup tab.
example for ethers providers:

Step 3
Drag and drop a Http Response node to reply to the request. Same as above, double-click and configure.
Status code - This is the HTTP status code that the node will respond with after completion of the request. We set it to 200 (OK)
Click on the Deploy button in the top right corner to save and deploy your changes.
Step 4
Now, go back to the Connect tab of your Integration Studio to see your API endpoint, which looks something like https://YOUR_INTEGRATION_STUDIO_API_URL.settlemint.com.
You can now send requests to https://YOUR_INTEGRATION_STUDIO_API_URL.settlemint.com/getLatestBlock to get the latest block number. Do not forget to create an API Key for your Integration studio and pass it as the x-auth-token authorization header with your request.
example terminal command:
curl -H "x-auth-token: bpaas-YOUR_INTEGRATION_KEY_HERE" https://YOUR_INTEGRATION_STUDIO_API_URL.settlemint.com/getLatestBlock
The API is live and protected by the authorization header, and you can seamlessly integrate with your application.
You can use the Integration Studio to build very complex flows. Learn more in this cookbook by Node-RED on the different types of flows.